Sunday, September 3, 2017

5 Ways to Support Your Friend’s Business Without Making a Purchase

Your best friend just joined the latest direct sales craze.  She’s hoping you’ll support her new business venture.  You don’t know how to break the news to her that you just don’t want another __ [cream, purse, bracelet, kitchen gadget, supplement, pair of leggings, etc.]__.  We’ve all been there. Some of us are just better than others at saying no (tactfully, without hurting anyone's feelings).  I am terrible at saying no.  Partly because I feel guilty, and partly because I honestly want my friend to be successful.  Unfortunately, I don't always want or need whatever they're selling.  Sometimes, I am willing to try their product, but I may not have an extra $50 lying around to spend.  The question becomes, is it possible to help our friends succeed in their direct sales businesses, without having to buy something?  My answer is, absolutely!  Here are my top 5 ways to support your friend’s business without making a purchase.


Be a Host

Hosting a party, workshop, or class is a great way to support your friend’s business and earn free stuff without having to make a purchase.  All you have to do is work with your friend to invite people and then get people to show up, either in person or online.  This is a numbers game. Generally, out of every 4 people you invite, only 1 of them will actually attend.  So if you want 10 people to come, you have to invite at least 40 people.  It will be more successful to send out individual, personal invitations, one at a time, using Facebook Messenger, rather than bulk inviting all 500+ Facebook friends.  People get so many invites every day.  After awhile, they stop feeling special or important.  Individual invitations will always be far more effective than bulk messages, and maybe that way you won’t develop a reputation as an over-inviter.  Before bulk inviting your friends to the event page, contact them through Messenger.  Give them a few details about the event, why you thought to invite them, and/or how they might benefit from attending.  Ask them if they are interested, and only invite them if they respond favorably.  Don’t be pushy.

Offer to Trade Skills

When it comes to direct sales, it’s hard to be an expert at everything.  What do you really excel at doing?  Are you great at marketing, accounting, online networking, graphic design, taking product photos, blog writing, or setting up a vendor booth?  Perhaps your direct sales friend would be willing to trade some free product for help with one of those areas.  If you are in direct sales too, try to figure out some ways to team up together.  Perhaps host a party or open house together, or offer a special incentive to each other’s customers.  Create a list of your strengths and weaknesses and brainstorm together to see how you could help fill each other’s gaps.

Help Them Promote Their Business on Social Media

If your friend is promoting their business on Facebook, chances are only a small percentage of their friends are actually seeing those posts, due to the way Facebook’s algorithms work.  The more people who interact with a post, the more Facebook will show it to others.  Be their number one fan by liking, sharing, and/or commenting on all of their social media posts.  This will really boost their exposure, and they will love you for it.  This works equally well for Instagram, Pinterest, and Twitter too.  Here’s an article I found that explains those complicated algorithms in more detail: 

Be an Idea Generator

Do you have great ideas?  Do you see things your friend is doing that may potentially harm their business? Do you see things they are not doing, but could be to help grow their business?  Sometimes I get so caught up in the details around me, it’s hard for me to see the big picture.  When that happens, I would love for someone else to come along and say “hey, I have some ideas that might help,“ or “hey, you might want to rethink this.”  Most people will readily accept positive feedback, though not all will appreciate constructive criticism.  Ask them if they are interested in hearing your ideas and feedback, and explain how being a sounding board is one way you are able to help support their business efforts.

Give Referrals

Maybe you aren’t interested in what your friend is selling, but maybe you know someone else who is.  During your conversations, if someone is talking about needing some new hair products, direct them to your friend who sells hair products.  If someone is complaining about brown sun spots on their skin, refer them to your face care friends.  Maybe you would even be willing to carry around a few of their business cards in your purse, so you can hand out their information as the need arises.  Word of mouth advertising is a tried and true way to support your friends.

When in Doubt, Ask

If you want to help your friend, but aren't sure which of the above methods would be the best choice for them, just ask.  Be honest about your situation.  Explain why you aren't interested in buying right now, but say you do want to support them, and ask if there are other ways you can help.    

Got Some Great Ideas?

How do you support your friends with businesses?  Comment below and share your ideas. 

Friday, February 19, 2016

Harry Potter Party Decorations

When planning the Ultimate, Magical Harry Potter Party, spend some time thinking about whether you want to do a general Harry Potter theme, or if you want to represent a specific book or movie.  We chose to do a general theme and so we used elements here and there from the entire series of books/movies.


Platform 9 3/4
We decorated our entry way (above) to look like the train platform 9 and 3/4, and you can find similar versions elsewhere on blogs and Pinterest.  I made the brick wall curtain out of a sheet (directions located at the bottom of this post).  I had an old looking trunk, originally purchased from Hobby Lobby using my 40% off coupon.  I found the old suitcase at an antique shop.  I purchased the Hogwarts banner online from Amazon.com, and hung it on some painted PVC pipes (which I had already made to hang the sails of a Pirate ship from a Pirate party) with a wooden stand my hubby made.  I bought the plush owl from Amazon as well.  The bird cage was from Hobby Lobby.  I made the broom by grabbing some dried tall grasses and reeds, bunching them together, and using wire to secure them around a long, skinny branch.  Grab a couple of empty boxes wrapped up with packaging string, addressed to Mr. Potter, and that completes the look.

Gringott's
When guests entered our house, their first stop was Gringott's to get their spending money.  I got these little cauldrons and fake coins on sale after St. Patrick's Day at Party City.  Each guest got a cauldron full of coins, a Honeyduke's coupon good for one chocolate frog, and a list of supplies they would need for school as first year students.  Then they were off to Diagon Alley to get their supplies.  I also had kids fill out a quick House quiz, so I knew which house to put them in.


Diagon Alley
We have a large basement with multiple rooms.  We turned each room into a different shop at Diagon Alley, although we didn't represent ALL the shops of Diagon Alley.  There's just too many of them.


Eeylops Owl Emporium - Some people actually go through the trouble of sewing little felt owls to give out to each of their guests.  I didn't have time for that, so my owl emporium was more like an information booth.  There were pictures of different kinds of owls and some facts about them, a few nests with some fake eggs, and a bowl of feathers (enough for each guest to take one feather).  I used a display shelf I bring to craft fairs, that my husband made for me, which consists of three window shutters, connected by hinges, with some sections removed so two wooden shelves could be thread through it.  This picture shows only the bottom half of the display. 


Flourish and Blotts - I turned a bookcase into this popular bookstore, by covering some books we already owned with brown paper and made them look antiqued.  I also printed some pictures of a shelf full of old books, and used it as a facade in some spots so I didn't have to recover every single book.  This was where the students had to pick up their books.  I made three little booklets for each kid to pick up: one for potions, one for herbology class, and one for spells.  For the second party, I also made the book of monsters, which I displayed on one of the shelves (not pictured here).


Madam Malkins - If you have costumes for the guests, this would be the place for them to get fitted for their robes.  I asked our guests to bring their own costumes or dress up as their favorite character, so we didn't need this shop.  I simply locked the door and hung a sign on it that said "closed...visiting relatives in Bavaria. Be back on Tuesday."


Quality Quidditch Supplies - For this I just decorated a table and some shelves.  I had a few brooms lying around, a Broomstick catalog, and baskets labeled with other quidditch supplies, such as golden snitches, uniforms, quaffles, and bludgers.  I had the guests look through the catalog and pick out which broom they wanted.  I asked them to fill out an order form and leave some coins to get their broom (which was to be delivered at some point in the future to Hogwarts).  I used some Harry Potter stickers I found at a scrapbooking store to make the labels seem more authentic.  The golden snitch was a prop from a Halloween store.


Ollivanders - is a wand shop, so we used my craft room for this shop and we made wands as one of the crafts during the party.  See the Harry Potter Party Games, Crafts, and Activities post for more details on making wands.


Slug & Jiggers Apothecary - I had another bookcase with glass doors on it that I turned into the apothecary.  This is where students picked up their potion ingredients, such as Gillyweed (kelp sheets cut into little squares), Powdered Bicorn  Horn (ground flaxseed), Aconite Tea (loose-leaf green tea), Black Obsidian Stone (a polished, black stone), Petrified Unicorn Tears (iridescent, tiny flattened marbles).  All these items were placed into tiny plastic bags and labeled accordingly.  I forgot to take a picture of this until after the party, and by then all the bowls were empty. 


Magical Menagerie - This is where students get their magical creatures, which in our case was flobberworms, (blue gummy worms).  It is also where I held the Care of Magical Creatures class.  This was just another shelf I turned into a "shop."  I had one shelf with 4 baby dragons and 4 different dragon eggs (to represent the Tri-Wizard Tournament).  I had a shelf with Acromantulas (spiders).  I also had some jars full of fake, creepy crawly bugs, snakes, basilisk eggs, and some other more dangerous creatures, which were "locked up in the trunks for their safety."  Although not pictured here, I also hung posters on the wall of some of the creatures mentioned in the Harry Potter books, like Acromantulas, Basilisks, and Hippogriffs, which I used to teach the class later.


The Leaky Cauldron - The kitchenette/bar area was turned into the Leaky Cauldron, where the kids could take a break and try some Butterbeer or Pumpkin Juice.


After the shopping was finished, the kids went to Hogwarts to get sorted into their houses and begin their classes.  We had a lot of kids come to the party (roughly 20-25), so we divided them into 4 groups and held 4 classes, rotating the groups through 4 stations (potions, herbology, defense of the dark arts, and care of magical creatures).  Check out the Harry Potter Games and Activities to see how we decorated each of those areas and for more details about those classes.

The Great Hall

We ate our meal in the Great Hall at Hogwarts (my dining room of course).  I made paper candles and suspended them from the ceiling at various heights using clear fishing line.  I made paper flames, but you could use electronic taper candles that flicker for a truly magical effect.  On one wall I hung the four house banners.  At the time, I couldn't find the house banners available for purchase, only the black Hogwarts one, so I just printed the crests from coloring pages I found online and had my kids color them.  I cut them out and glued them to a solid color piece of cardstock in the correct color for each house.  For the other wall, I found a bunch of cheap frames at a thrift shop, and a collection of creepy looking, old, black and white photos online that I just printed and hung randomly all over the wall.  Okay...yes, one of the portraits is Edgar Allen Poe.  I couldn't resist. When I see him I think of the Raven and it's just creepy.  We didn't spend very much time in this room, so I didn't spend as much time decorating it.  If I do this party again, I might try to find pictures of some of the ghostly people featured on the Hogwarts wall from the movie to print and frame.


Lastly, I created a table for the kids to deposit the birthday presents.  I made a few more fake books and a fake newspaper, along with the sorting hat, which we used to sort the kids into their houses.  I also created posters of the Proclamations from the Ministry of Magic which I "tacked" to the wall and some wanted posters of notorious criminals, like Bellatrix Lestrange.


Instructions for Making Harry Potter Props and Party Decorations

Making the brick wall for Platform 9 3/4:
I used a king size tan-colored sheet.  I folded it in half, lengthwise, to find the middle, and made a small slit at the bottom.  Then I simply tore it to the top (wide) hem, but not through it.  Next I cut across the top hem at each end, so I had a little tube to thread the curtain rod through, without having to sew one myself.  You could also use any large piece of fabric and make your own hem at the top that is wide enough to accommodate an adjustable shower curtain tension rod.  Next I took a rectangle sponge, a disposable plastic or Styrofoam plate and some acrylic paint in a couple different shades of browns, tans, reds, and/or grays, depending on what color bricks you want.  I tried to make mine match the bricks that were on the front of our house, so it looked like they were truly walking into part of the wall.  Lay a plastic shower curtain, a paint cloth, some large garbage bags, or large pieces of cardboard down underneath the sheet, because the paint will bleed through the fabric onto whatever is underneath!!  Squirt a few puddles of 3 different shades of paint onto the plate, swirl it with the tip of your sponge to create a somewhat marbled effect.  This just adds some variation in the color, so the bricks look more realistic.  Lay your sponge (flat), down into the paint and pat lightly to coat.  Start from the top or the bottom and "stamp" a line of evenly spaced rectangles horizontally across the fabric, to create bricks, adding more paint as needed.  Don't worry if the sponge doesn't totally saturate the fabric.  You want to have a few blank spots where the paint doesn't touch, so it looks like the texture of brick.  When you get to the next row, stagger the bricks, so the edges don't line up with the ones above, but are centered in between two, to get a realistic looking brick pattern.  Use the picture at the top as a reference.  Keep working, row by row, until you've finished both panels.

Making a Sorting Hat:
First, I used a large piece of tag board to make a cone shape, by cutting out a large circle, finding the center point, then cutting one slit from the edge of the circle to the center point.  Allow the cut edges to slide past each other and keep tightening until it forms a cone shape that is big enough to fit on a child's head.  I used my kid to measure the right size.  Tape it in place.  Next I used brown paper grocery bags (the unprinted portions) and a paper mache recipe.  This project gets messy, so put down some plastic or newspaper to protect your workspace.  Brown paper starts to fall apart when it gets too wet, so you have to work kind of quickly and delicately.  Dip a scrap of brown paper into paper mache, use your fingers to slide some of the excess paste off, then wrap it around the cone.  Allow the paper to fold and crinkle.  Keep working until the entire cone is covered.  Create a brim.  Next form some additional folds to give the impression of two eyes and a mouth (see picture).  When the hat is fully dry, which may take a few days, you can paint it.  I used chocolate brown spray paint (outside) and just lightly sprayed.  You want there to be parts that remain unpainted so the original brown paper shows through.  This gives it a weathered old leather look.  Lastly, use a darker brown, black, or charcoal gray paint and dry brush the depressions where the eyes and mouth are, to make them more distinct.  The dry brush technique simply means take a dry paint brush, without getting it wet, and just dip the very tip in a small amount of paint, then quickly drag it over in a crisscross kind of pattern.  You don't want the area to be completely covered in paint.  Voila!  You're done!

Making Hanging Candles:
Take a piece of cream colored or white cardstock.  Roll it around a mop or broom handle to form a tube, then glue or tape the end down.  My tape kept coming apart, even when I used double-sided sticky tape.  I had the best luck with rubber cement.  It dries quickly, stays put, and is easy to fix (before it dries) if you make a mistake.  I used a piece of tape to hold it in place until it dried.  Then I cut "flames" out of yellow construction paper or cardstock, that was wider than the diameter of the top of the candle, but then I made little tails that were the same diameter of the candle, so it would fit down into the tube and hold the flame in place.  I used an orange marker to draw a little flame in the center, then taped it to the inside of the candle.  (See picture above) I used a teeny tiny hold punch to create a small hole near the top of the candle (on the candle, not on the flame), and I tied a short length of fishing line to it, and then I used small, clear command hooks to attach them to the ceiling.  Tape and thumb tacks didn't work.  The candles kept falling down because tape/tacks couldn't hold the weight of the candle.  I've also made paper candles that are big enough to accommodate an electric tealight at the top, but they are heavier, trickier to work with, and a bit more costly.  It's tricky to keep the tealight from slipping down into the tube of the candle.  If you tape or glue the tealight in, you'll end up destroying the paper candle later if you need to take the tealight out for any reason (like when the battery needs to be changed halfway through the party).  When using tealights, it's best if you can make them removable.

I found all the rest of the signs, labels, and printable templates by searching through Pinterest.

Monday, November 9, 2015

Harry Potter Invitations

Depending on the size of your guest list, invitations can get expensive real quick or be overly time-consuming to create yourself.  Here are some things to consider when planning invitations:
What kind of budget do you have?
It's important to have an idea of how much money you want to spend on invites before you even begin.

How large is the guest list?
Our school had a policy that you could not send invites to school for just a few kids out of the class.  You must invite all the girls, all the boys, or the entire class.  Since our kids were close to both girls and boys, we decided to invite the whole class.  That meant roughly 50 invites between the two kid's classrooms.  I wanted to keep the invitations at less than $1.00 per kid, so that really narrowed my options.  If you only have 8 kids on your list, you might be able to do something more extravagant.
 
Are you hand-delivering the invitations or mailing the invites?
I found an awesome idea for owl balloon invitations (see photo to the right), but they would require hand-delivery.  Since we planned to pass our invites out at school, I decided against balloons.  There are several tutorials floating around (who says I'm no good with puns?) if you want to learn how to draw and color cute little owls on white, helium filled balloons.  Then you roll your invitation letter, like a scroll, tie it on, and leave it on the doorstep. (Actually, I would tie it onto the doorknob so it doesn't blow away).  If you aren't into drawing, here's an Etsy seller who has a printable owl template for sale.
Here's another adorable handmade option I found, which is perhaps more time-consuming, but a lot easier to pass out in class or send via mail.  One creative mom made 10 of these cute felt owls to give out with her son's invites (picture at left).  I'm so impressed by her creativity!  I might have even attempted something similar, if I hadn't had 50 invites to make. 

Don't forget though, if you are mailing anything three-dimensional, it will require special packaging and additional postage.  You also can't mail letters that have a wax seal on the back.  Check with your local post office ahead of time, to see what their restrictions are or if they have any suggestions.
Do-It-Yourself vs. Purchased?
If you are looking for ideas, simply type the words "Harry Potter Invites" into Etsy, and you'll get a plethora of options from which to choose.  Since I needed at least 50, that put the majority of options out of my price range.  I have Microsoft Publisher on my computer, so I decided to make them myself.  I found a few invites I really liked, selected my favorite, and tried to recreate it.  I modeled my invite after one similar to this "Hogwarts Acceptance Letter," which I printed on parchment style paper, and I ended up skipping the owls.

Other ideas of items to include in the invite instead of an owl might be:
  • Tuck a feather into the envelope, such as a large white bird's feather
  • Add a real wax seal, or stickers that look like a wax seal, to close the back of the envelope
  • Include a code word, required to enter the party, written in lemon juice, which can be revealed by heating the paper, like with a hair dryer
  • Include a short personality quiz, for guests to fill out and bring to the party, to help sort them into the appropriate house
  • Some "gold coins" from Gringott's bank, for students to buy their school supplies when they arrive at Diagon Alley, or the key that's required for them to enter their bank vault.
  • Their ticket to board the Hogwart's Express (at Platform 9 3/4 of course).
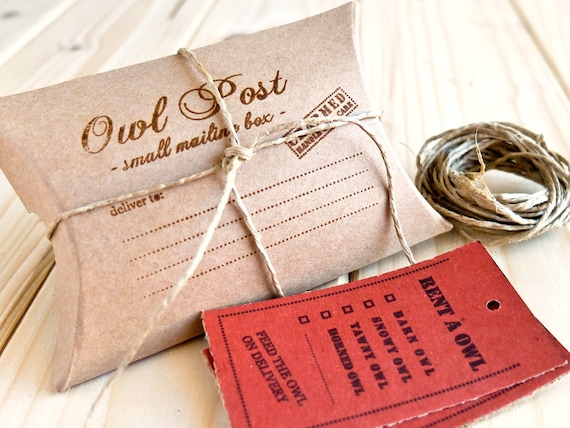
Here are a few other invites I really like. You can click on the first two images to visit their blogs, where you'll find downloadable templates and complete instructions.  The owl post pillow box is available for purchase on Etsy.

Sunday, November 8, 2015

Planning a Magical Harry Potter Party

We don't have huge birthdays every year.  Sometimes it's just been us, our own children, the birthday kid's favorite meal, a cake, and a couple of presents.  That's it.  Every once in awhile though, we have a big blowout bash of a birthday...the kind of birthday that (we hope) our kids will remember forever.  Since our oldest and our middle child have birthdays 10 days apart, we often feel like we're throwing back-to-back parties.  Hoping to eliminate some work, we decided to use the same theme for both.  That way we could decorate the house once and throw the same party twice.  All we needed was a party theme that would work equally well for both genders and for kids ages 7 to 9.  Harry Potter fit the bill.  Here's how to plan a magical Harry Potter party.


The internet is awesome.  I found so many great ideas online.  With lots of time and an unlimited budget, you could throw a party so realistic, it'd feel like they were actually attending Hogwarts.  I wanted to create that kind of magic, and I had the time, but I didn't have an unlimited budget.  Still, there are many, many things you can do yourself, to keep it affordable, and still make it look fantastic.  It takes some upfront planning.  If you want it to be truly magical, you can't just throw it together in a week, (unless you already have most of the decorations).  I found it helpful to start planning months in advance.  For example, try to take advantage of the after-Halloween sales.  Owls, rats, potion bottles, creepy cloth, etc. are harder to find, and more expensive to buy, during other times of the year, but they all go on sale after Halloween.

Since there's so much to cover, I'm breaking it down into several different posts.  For each area, I'll try to present both simple and complex ideas.  Simpler ideas for those who either don't have a lot of time, or who are perhaps not as confident about their crafting skills.  Complex ideas for those who like to go completely over-the-top.  I will include links to the following sections as I create them:
  • Invitations
  • Decorations
  • Party Food  (coming soon)
  • Costumes  (coming soon)
  • Activities  (coming soon)
  • Goodie Bags  (coming soon)


Tuesday, December 30, 2014

Creative Mess!

So...tomorrow is the last day of 2014, and per usual, it's the time of year when I start to look back at what I've accomplished and what I haven't.  I also make a list of what I hope to accomplish next year.  Yes, I pat myself on the back a little, because let's be honest, mom's don't usually get a lot of praise for  all the stuff we do every day.  I also do this to give myself a little boost of encouragement so I can tackle next year's challenges; kinda like psyching myself up for a big race. (Metaphorically speaking of course, cause I don't run, and I mean never).  This year, my evaluation is not helping though.  I'm looking back and seeing more things I didn't do than I actually did.  For example, I didn't spend very much time in my craft room creating, which is how I'd really like to spend the majority of my time.  When I did create stuff, I didn't blog about it, which is my other favorite thing to do.  I actually had a few friends say, "Hey!  You haven't posted anything in awhile.  Are you still alive?  What's going on?"

In truth, my lack of blogging is mostly due to the fact that my craft room spent 90% of the year looking like this:


Not even kidding.  How can anything creative happen in a space like that?  What's worse, I noticed a disturbing trend.  I start a lot of things.  I start a lot of things all at once.  I start them with a passion, but the passion fades or fizzles out entirely or I move on to the next something that seems more alluring at the time.  I've got no stamina. 

On the bright side, I guess this means I'd be good at sprinting.  If I were a runner.  Which I am not.  And I'd be terrible, horrible, awful, no good, very bad at long distances.  And really, who cares about the sprinters?  No one puts a 500 meter dash sticker on their car.  It's the marathoners who get all the glory.  So, how do I keep my interest and passion going long enough to finish?  Is that possible?  How do I finish WELL?

Supposedly, new habits take 21 days to form.  In theory, science tells us that twenty-one days of consistently doing a new thing will change it into a habit.  I can't say this really works on my kids.  I've been telling them to leave their shoes by the door every day for the past 6 to 11 years, and I still find multiple pairs of shoes in random places throughout the house quite regularly.  However, for the sake of my future creative self, I'm choosing to believe wholeheartedly in the possibility that change can and will happen.  I can start one project at a time and actually finish it before moving on to another.  I can form new habits that will keep my room tidy and organized so some real creative work can actually happen in that space.  But I need a little direction and encouragement to keep me going.

Enter in Kathi Lipp's new book, "Clutter Free: Quick and Easy Steps to Simplifying Your Space."  Oh yes!  This book was created specifically for people like me.  Kathi also launched a new 21 Day Clutter Free Challenge.  Even better.  So I'm jumping in with both feet and posting my progress here (and on Facebook) in the hopes that it will keep me honest and keep me moving forward towards the finish line.  If you find me stalled on the side of the road, please give me a swift kick in the rear or dump some cold water on my head to get me up and moving again. 

New year, new plan.  If anyone else shares my dream of a de-cluttered house, garage, or work space, you can participate in Kathi's 21 Day Clutter Free Challenge, by signing up here.
www.kathilipp.com
**Update**
I am happy to say that my messy craft room now looks like this:
One of the biggest problems of having a messy craft room, was the amount of time it took to find the supplies and tools I needed, before I could even start on a project. Kathi pointed out how much time is wasted searching for lost stuff. Being clutter-free allows me to be more productive. When I manage my stuff more effectively, I can manage my time more efficiently. Now that I have cleared the clutter, I spend far less time searching for supplies, which frees up more time for me to do the crafts I love. In addition, the space is much more inviting. I just love relaxing and creating in my beautiful, clutter-free room.  #ClutterFree
Thank you Kathi Lipp!

Wednesday, July 9, 2014

"Be You, Bravely" Key Chains, MOPS


Here's a tutorial for making key chains that coordinate with this year's MOPS theme, "Be You, Bravely."  These ended up being about $1 per key chain, since I purchased the beads when they were on sale and used my 40% off coupons wisely.  I made several different variations, but the ones with the feathers were my favorite :)


The directions will be slightly different depending on which kind you want to make, but they all use Shrinky Dinks. 

1. The first step is to create a file you can print onto the Shrinky Dink plastic.  You could use Microsoft Word, or an image editing software, or even the program that came with your printer to print multiple copies of the image onto each page.  I used Microsoft Publisher so I could print 20 logos per page with enough spacing around them to cut with a Paper Punch into perfect circles, squares, or scalloped circles.  It took a bit of time and trial and error to get them to work.

2. Print them onto the Shrinky Dink plastic.  You have to use the Ruff N Ready Frosted kind or the ink will never set and it will just smear right off.  I tried bringing them to an office supply store to reproduce for me, and the plastic got caught in the printer.  The problem with most commercial printers is they use heat.  Shrinky Dinks shrink with heat, so they get warp and get stuck the minute heat is applied.  They are also slippery, so its tricky to feed them through.  It may take a little time and patience to get them to work, so be sure to allow yourself ample time for this step.

3. Color them, if desired.  I used a Neon Green Sharpie and a Turquoise Blue Sharpie to add a little color to the feathers.  My 9 year old son enjoyed helping me.

4. Punch them out.  I used a 2 1/2 inch circle punch (from Stampin' Up!) to punch out each one.  They will shrink down to  about the size of a quarter.  Also, don't forget to use an 1/8 inch hole puncher to create a hole near the top of each one so you can attach them to the key chain.  If you don't have a large circle punch, you can use a paper trimmer to simply cut them into squares.  I recommend you cut them at least 2"x2" so they don't shrink down too small to see the logo.  The scalloped circle punch below shrunk down to about the size of a dime!


5. Follow the directions included with the Shrinky Dinks to bake them.  It helps if you use a pan that is totally flat with some parchment paper or brown paper bag on it for easy transfer.  When you take them out, lay another sheet of paper over the top and put something flat and heavy on the top so they won't warp.  Don't use paper towels...the texture of the paper towels will leave an imprint of the texture into the Shrinky Dink.  Same with wrinkled paper.  Your final product will end up with creases in them.  My kids loved watching them shrink.  It was like magic.

6. Next, assemble the key chains.  You could skip the beads and just use a jump ring to attach the circles to the key chain ring.  If you decide to go this route, make sure you use extra large jump rings (15 mm or greater).  If you've never worked with a jump ring, be sure you open it by twisting, not prying it apart.  Here's a blog that explains the right and wrong way to use jump rings: http://jewelrytutorialhq.com/jump-rings-right-way/

If you want to create beaded key chains, you'll need an eye pin with a loop on one end, one large bead of choice, and two size E seed beads.  Those are the larger seed beads.  Put them on in the order shown in the photo below.  Then you'll have to use a needlenose or round pliers to create another loop on the other end of the eye pin and wrap the extra wire around the eye pin to secure the beads.  If you've never done this before, here's a tutorial I found on YouTube that shows you how to do this: https://www.youtube.com/watch?v=I5JoW6w0e_o  Attach a jump ring to both ends.  Then attach one jump ring to the key chain ring and the other end to the Shrinky Dink circle. 


If you want to do the feathered key chains, you'll have to buy Tube Crimper Beads and use a special crimping tool to attach the tube crimper to the stem end of the feather.  Here's another tutorial for using crimp tubes, (but instead of chain use the feather:) https://www.youtube.com/watch?v=M9kEcciXxmY 
I found the pack of feathers and the tube crimp beads at Hobby Lobby.  I also used a little glue inside the crimp tube to make sure the feather was secure.  I made a bead charm using a flat ended eye pin and an extra large jump ring to attach all three items onto the key chain loop.   


That's all there is to it.  If you have any questions, feel free to post them in the comments section.  Thanks!!
Sarah

Monday, July 7, 2014

Feathered Centerpieces for the new MOPS theme, "Be You, Bravely"


I made these centerpieces for our MOPS Spark! Leadership Convention.  I think they coordinate nicely with the new MOPS theme, "Be You, Bravely" and would make pretty table decorations. They are very easy to assemble and most of the supplies can be found at Michaels or Hobby Lobby. 

Start with a clear glass vase.  I found this one at Hobby Lobby for $9.99.  Occasionally they put all their glassware on sale, which is great if you need a bunch of them.  I chose this specific vase because it's not too tall and has a slight indentation at the neck, which makes it ideal for adding ribbons, raffia, or string to dress it up. 


The first step is to create a little paper "nest" with some shredded craft paper.  You can find natural, premade basket filler in the gift wrapping sections of most craft stores.  However, I made my own using my stash of brown paper bags and a paper shredder.  Be sure to use plain bags with nothing printed on them.  Cut them into rectangles that will easily feed into your shredder.  Grab a handful and add it to the bottom of your vase.


Next, add string or raffia to the neck and tie on a rustic-looking key.  Last fall I was fortunate enough to find these large decorative keys on sale at Michaels for only 69 cents and I bought one of each style.  My little collection wasn't enough for ten centerpieces though, so I went out in search of more keys.  I had a little trouble finding them at a reasonable price.  Hobby Lobby had a pack of 6 or 7 keys, with words such as "Memories" on them, in the scrapbooking section for around $10.  I also found some in the jewelry section of Michaels, but they were between $4 and $8 per key.  Yikes!!  You may have better luck finding them online.  
I thought about adding a tag with the word "Courage" on it to represent the Courage Keys, which will be given out to every registered MOPS member this year.  Maybe if I have more time I'll add that later...

 
Next, fill the vase up with some crumpled paper.  This helps hide the stems of the feathers and makes the vases look full.  It also adds more texture and dimension.  I wanted to incorporate the idea of being brave enough to share our stories with each other, so I tore these pages out of books.  Yes, I know...book lover's everywhere are cringing right now.  I admit, it was really hard for me to destroy a perfectly good book.  It's not like I'm burning it though, just repurposing it.  Besides, one book was sufficient.  If it makes you feel better, use a book that is already damaged.  I sent my husband on an errand to find one that was Christian based, because it would be pretty embarrassing if someone found a swear word or something overly provocative peeking through the glass.  Our library routinely gets rid of overstock by putting books on sale for 50 cents to a dollar per book.  Loosely crumple the pages and stuff them around the perimeter of the vase, leaving a little space in the middle for your feathers.   

 
Add your feathers.  I'm not gonna to lie.  The feathers were pretty pricey.  The turquoise blue ostrich feathers were $3.99 each!  The peacock feathers were $1.99 each and the pheasant clusters were $2.99 I think.  One feather didn't quite do it.  It looked awfully lonely and sparse.  This grouping seemed to be the right mix, plus I absolutely adore the combination of brown and turquoise.  I used some string to tie the stems together.  This helps them stand up a little straighter, makes for a tighter cluster, and will make it quicker to disassemble again for easy storage. 
 
You may be able to cut costs by finding a local supplier for the feathers or buying them bulk online.  You could also use fewer feathers and just add more flowers.  However, our MOPS group has used so many fake flowers for centerpieces over the past few years that I just wanted to go in a different direction. 


The final step is a burlap flower.  Yes, *gasp* it's another fake flower.  I went with a burlap one though, which is not the typical go-to flower and it adds some rustic charm.  When I saw these at Hobby Lobby, I fell in love with them.  They had several different kinds of burlap flowers, so it was hard to choose just one.  There are tons of tutorials out there for making these yourself, and I was very tempted to give it a try.  However, I was pressed for time.  I still had to make 70 key chains too, so I opted to buy the burlap flowers instead.  They were $2.49 per flower. 
 
And voila...you're done!  The total cost is between $14 and $24, depending on how shopper-savvy you are.  You can save a lot by using 40% off coupons and waiting until specific items go on sale.  

We used teal green or turquoise blue plastic table cloths with a square of burlap cloth under the vases.  It would also be pretty layered with another cream-colored placemat, (as pictured).  Since the ostrich feathers come in a wide variety of colors, you could use a different colored feather, along with a matching table cloth, to distinguish the tables from one another. 
 
If you find a good source for any of the supplies I mentioned, feel free to share it by commenting below.  I hope this inspires you to create something beautiful today!
 
Sincerely,
Sarah


Thursday, January 3, 2013

Star Wars Themed Boys Room

My 7-year old son loves Star Wars, so his bedroom is a a wonderful sci-fi mixture of the trilogies and the Clone Wars.  I've seen some really cool Star Wars themed rooms out there.  You could dump a lot of money on creating a totally sweet bed that looks like the Millennium Falcom or the inside of the cockpit of a Fighter starship, but you don't have to.  There are lots of easy things you can do to create an awesome Star Wars themed room without spending a fortune.

My mother-in-law saved a few of my husband's old Star Wars figurines, along with a calendar that included pictures from the first trilogy.  I framed the calendar pages with their matching figurines in shadowbox frames, and I love the way they turned out.  They hang on the wall above his desk.

I also bought some vinyl clings to put up in various empty spots and a couple of posters I found on AllPosters.com.  Some I framed, others I just hung up as is using 3M products.  They also have vinyl clings or stickers with memorable quotes from the movies, which would be a fun addition.  Our walls are textured, and those stickers don't stay on very well.  If you have the same problem, try using a piece of plexiglass, metal, wood board, or canvas instead of putting the stickers directly on the wall. 

The walls were already painted a light grey.  For the ceiling, I used a faux painting technique with a special roller called "The Woolie," which is a double roller and comes with a separated tray so you can use two colors at once.  You apply the paint in a large, over-lapping V pattern.  I used a dark blue paint color and a black paint color.  I used semi-gloss, but if I had to do it over again, I'd probably go with less gloss, either completely flat or eggshell maybe.  I covered the whole ceiling, plus 18 inches down on the walls on all four sides.  This gave it a dome effect.  The picture doesn't show all the detail, but you get the drift...


Onto the stars....at first, I used glow in the dark paint to make stars, but the consistency was really runny and hard to control.  Also, it was transparent, so it was hard to see what I was doing.  Plus it didn't glow very well.  I decided to try blacklight-sensitve paint instead.  I found some wonderful fluorescent paints to make the stars and a galaxy.  We bought a large blacklight and the stars really pop out.  It looks amazing at night.  For the final touch, we bought some model starships, put them together, and hung them from the ceiling using fish-line so they look like they are flying.  We put Rebels on one side of the room and The Republic on the other.  They are facing each other, like they are heading into battle.

I also painted the Death Star on canvas and added some fluorescent details to it as well. 

If you are not a painter, try wallpaper, borders, or stencils.
 
For the bed I bought a plain, solid blue comforter and dressed it up with some Star Wars pillows and a plush Yoda.  I saw some cool pillows on Etsy.com where they took a solid color pillowcase and appliqued symbols for the Republic and the Rebels that were cut out of felt.  Looked easy enough to do on my own, so that project is still on my to-do list.  We also purchased a Bobo Fett lamp/clock.

Here are some of the other cool things I found online:

Inspiration: http://www.slashfilm.com/cool-stuff-star-wars-y-wing-themed-bedroom/
Beds: http://www.forevergeek.com/2011/05/6-killer-star-wars-beds/

Vinyl Clings & Wall Stickers: http://www.kidsdecoratingideas.com/star-wars-theme-room.php

Wampa Rug: http://www.thinkgeek.com/product/e071/ 

Voice Activated R2D2: (for the older kid) http://www.skymall.com/shopping/detail.htm?pid=102962936&c=&cm_sp=Search-_-Suggested-_-102962936

Anyone else have some cool Star Wars room ideas?  Please share!


Tuesday, January 1, 2013

A "Year In The Life Of..." Album

A few years ago I purchased a scrapbooking magazine that had a fabulous idea.  It was a "Year In The Life Of..." album, which captured the regular, every day moments that make up the story of our life.  The basic concept is to take one photo a day, every day, for the whole year.  At the end of each week, you create one scrapbook page with seven photos, so by the end of the year you have 52 pages (or 26 double-sided).  For the less ambitious version, do one or two photos per week, and create one scrapbook page per month for a total of twelve pages.  I loved this idea, but when I found the article, it was well into springtime already, which was a bit late to start.  So I waited...

Last January I was so excited to start the project.  I was diligent about taking several photos every day, to be sure I would have several to chose from, and I even made some journal entries in a notebook so I would remember the context and importance of the photo.  I used the Picasa software to create a photo collage, which was very quick and easy...my version of digital scrapbooking.  I did this for three weeks.  Then, one day somewhere in the middle of the 4th week, I had a crazy busy day and completely forgot to take photos.  I realized it early the next morning and I took extra photos that day to compensate.  I figured no one would know the difference from one day to the next.  A couple of days later, it happened again.  I forgot to take photos.  This time three days went by before I remembered.  Well...I sure blew THAT idea.  


This year I'm shooting for the less ambitious version.  Maybe I'll just do "A Week In The Life Of..." or just a month, instead of a whole year.  I'm hoping I'll have better luck fitting that into my schedule. :) 

Here's a great article I found that explains how to start a project like this along with some awesome tips for success:
Project 365: How to Take a Photo a Day and See Your Life in a Whole New Way

Here's a blog of someone who actually does this.  She takes a photo every day and writes a little about it.  Contains some neat ideas...
Daily Documentation: Document the Everyday, Every Day

Here are some other resources I've found that might help with this project:

10 Can't Miss Photos To Take Each Month from Creating Keepsakes Magazine

Photo-a-Day Layouts: Cool layouts for scrapbooking a week's worth of photos

A Year In The Life: Scrapbook your year in 24 simple layouts ebook.

Start taking those photos!!!  I can't wait to see them!

Have you tried this scrapbooking technique before?  Was it successful?  Please comment below!
Happy crafting!
~Sarah

Wednesday, September 5, 2012

Simple Beaded Bracelet in Water Hues with Charm

We'll be making these simple beaded bracelets for our first MOPS craft this year. Our theme is PLUNGE! (as in, take the plunge, dive in head first...). 
I'm sharing it here because it would also make a great Girl Scouts craft or Girls Night Out craft, and it can be easily adapted for different themes or colors.

Since PLUNGE is a water theme, I was inspired to use water hues and picked mostly beads that are transparent.  I even found some that were shaped like little shells.  I added some metal beads for more variety and finished it off with a charm.  I bought starfish charms, but I also got some inspirational word charms (love, faith, friend, grace, etc.) in case some people dislike the look the of the starfish.  I purchased all of the beads at orientaltrading.com and the Stretch Magic bead cord at our local Michaels craft store (about $2.49 for 5 meters of .7mm).


Supply List
(Enough to make 48 bracelets)

2 pkg Nugget Word Charms--$7.25 each
2 pkg 7mm Silver Tone Dotted Barrels--$4.25 each
3 pkg Winter Colors Bead Assortment--$7.99 each
1 pkg Metal spacer bead assortment--$16.00
4 pkg 8mm Clear Cut Glass Crystal beads--$5.50 ea
4 pkg 12mm Blue/Aqua Shell Glass beads--$6.25 ea
1 pkg Silver tone Metal Starfish Charms--$6.25 ea
-------------
$116.22

Plus 4 packages of the Stretch Magic cord @ $9.56
I used the .7mm cord because the 1mm cord is too thick to go through some of the beads and the .5mm cord is so thin that it sometimes breaks when tying it off.

Total was $125.78 divided by 48 finished bracelets comes out to about $2.62 per bracelet.


To make bead kits:
I pre-package little kits to make it easier, although it's a bit time-consuming.  You could just put the beads into separate bowls with a note next to each one of how many to take.  Then let the women go through the line with a bag or dixie cup and get their own.  However, I've noticed that some people will take more of one kind of bead and none of a color they don't like.  Then you run out of those colors and the last few people through the line end up with leftovers.

Put into each bag:
  • Grab 48 snack size baggies.
  • Sort all of the metal beads by type.  Select 4 different styles of the metal beads and put 2 of each style in the bag for a total of 8 metal beads.  I tried to mix it up (4 barrel, 4 round kind).  If you put all barrel style in the same bracelet it changes the length and is too long.
  • 2 small white beads, 2 large white beads
  • 2 small aqua beads, 2 large aqua beads
  • 2 small blue beads, 2 large blue beads
  • 4 clear crystal beads
  • 4 shell beads (2 with aqua stripe, 2 with royal stripe)
  • one charm (word or starfish)
  • 10-12 inches of Stretch Magic cord
  • An Instructions Card (see below)  Download FREE instructions pdf
 
 Get crafty with your group this week.  ENJOY!  ~Sarah